Pay runs
Learn everything about pay runs: what to know before your first pay run, how to create, process, schedule, edit, and delete pay runs, use the group by payee feature, troubleshoot issues, check bank support, and view your pay runs.
On this page
| What you need to know before your first pay run | Processing pay runs | |
| Scheduling pay runs | Editing pay runs | Deleting pay runs |
| Group by payee | Troubleshooting | Bank support for pay runs |
| View your pay runs |
What you need to know before your first pay run
Before processing your first pay run with Crezco, make sure to check the following:
- Bank Compatibility: Confirm that your bank is compatible with Crezco and supports bulk payments through open banking. Please refer to the following help centre article to find additional information on your bank: Click here
- User Permissions: Ensure you have the correct user permissions for your bank account to authorise payments.
- Immediate Payments: Once an immediate payment is sent, it cannot be canceled. If you need to pull back funds, you will need to speak to your bank directly.
- Scheduled Payments: To cancel a scheduled payment, you must contact your bank directly.
- Payee Account Details: When entering in account details for payees, make sure you double check the information inputted to ensure the information is correct to the best of your knowledge.
Review these steps to ensure a smooth and secure pay run process.
Creating pay runs
To create a bulk payment, or pay run, you need to be on either our Send Plus or our Premium package. Click here to find out more about these packages and features.
Please note that not all banks can support bulk payments. Click here to find out if your bank can, and for bank specific limitations on payment sizes and number of payees.
- First step is to import your bills/payroll information into Crezco. If you are not sure how to import your information, please use the following help centre article: How to import your payments into Crezco.
- Navigate to the Accounts Payables tab on the left hand side of your page. Select all the bills/employees you are wanting to pay in this pay run by checking the box on the left hand side of their name.
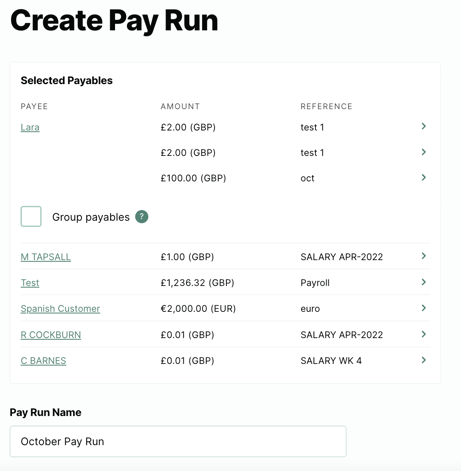
- Then on the right hand you will be able to see the bills/employees you have selected to include in the pay run. Click on 'Create a pay run'.
- You will then be asked to enter in a name for the pay run. Once you have done so, click the 'Save pay run' button.
- Once saved, you will be redirected to our Pay Runs tab where you will be able to see all the pay runs you have created, ready for payment
Processing pay runs
- Log into your Crezco account and navigate to the Accounts Payable tab on the left hand side of the page.
- Click on the Pay Runs tab at the top of the page.
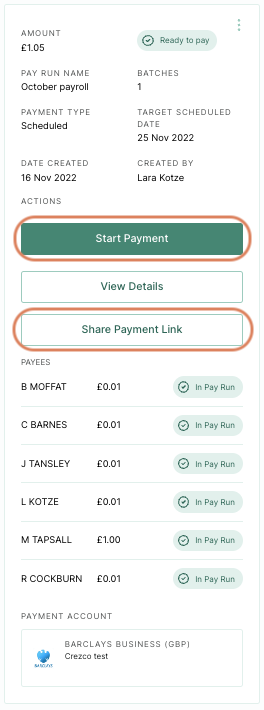
- Select the pay run you wish to process. On the right hand side you will see that you can either start processing the pay run yourself or send the payment link to your client/company owner.

- You will then be taken to a payment page in which you can see the total amount of the batch payment and who will be getting paid.
- This is great for when you send the payment link to your clients/company owners, they will be able to double check all the information!
- This is great for when you send the payment link to your clients/company owners, they will be able to double check all the information!
- If everything looks good, click 'Confirm' at the bottom of the page. Please note:
-
- If you are making a large batch payment, it will take a minute or so for the system to finish creating the batch payment with the bank's system
- Once the system has finished creating the batch payment, you will automatically be taken to your banking log in page
6. You will then be redirected to your bank, to confirm the payment.
7. To view pay runs/payments you have made within Crezco, navigate to the History tab within the Accounts Payable section of your account.
Scheduling pay runs
Please note:
- You will not be able to schedule for a payment to be paid out on a weekend or bank holiday
- HSBC requires a pay run to be scheduled with at least 2 or more business days before the payment is due
- Once a schedule pay run has been confirmed, they will appear in your online banking. Always great to double check in your bank account after confirming a pay run with Crezco.
- Log into your Crezco account, and navigate to the Accounts Payables tab on the left hand side of your page
- You will then want to select the bills that you are wanting to include in the scheduled pay run.
- Once you have selected the bills you want to add to your pay run, select the 'Create a pay run' button on the right hand side of the page.
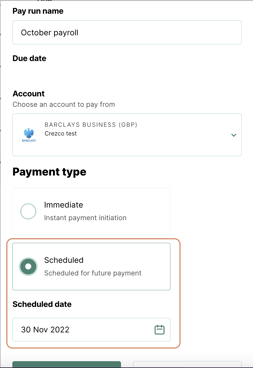
- You will then need to fill out the following details:
-
- Enter in a name for the pay run. This is to provide context for the payer, the payee(s) don't see this.
- Confirm the bank account you would like to submit the payment from.
-
- Set 'Payment type' to 'Scheduled', and select the date you wish to payment to occur.
- Click 'Confirm'.

You will then see the pay run you have just created in the Pay Runs tab of the Accounts Payable section, ready to be processed!
Editing pay runs
Note: You can only remove payees from an existing pay run. To add payees, adjust payable amounts, or change the payment bank account, you’ll need to delete the current pay run and create a new one.
1. Navigate to the Accounts Payables section on the left hand side of the page
2. Select the Pay Runs tab up at the top of the page
3. Find and click the pay run you wish to edit the payees
4. On the right hand side of the page, you will be presented with a preview of the pay run. In the top right hand corner of the screen, click on the 3 dots stacked on top of each other.

5. Select to Edit payees
6. You will then see the option to click Remove next to that specific bill/payee in the pay run
7. A pop up will show up in the middle of the screen, ask you to confirm you would like to remove the payee from the pay run. If you are happy to proceed, click Remove Payable
8. Payee will then be removed from the pay run
Deleting pay runs
1. Navigate to the Accounts Payables section on the left hand side of the page
2. Select the Pay Runs tab up at the top of the page
3. Find and click the pay run you wish to delete
4. On the right hand side of the page, you will be presented with a preview of the pay run. In the top right hand corner of the screen, click on the 3 dots stacked on top of each other.

5. Select to Delete pay run

7. A pop up will show up in the middle of the screen, ask you to confirm you would like to delete the pay run. If you are happy to proceed, click Delete pay run
8. The pay run has now been deleted! The payables in the pay run will still be in the Payables section of your account and ready to either be paid individually or for you to create a new pay run.
Group by payee
- Navigate to the Accounts Payables tab on the left hand side of your page. Select all the payables you are wanting to process in this pay run by checking the box on the left hand side of the payable.
If you do not see the bills you are wanting to pay, please use the following article to walk you through manually creating or importing your bills.
Import bills - Then on the right hand you will be able to see the bills/employees you have selected to include in the pay run. Click on 'Create a pay run'.
- On the follow page, if there are multiple bills for the same payee within the pay run, you will be given the option to Group payables.
Please note: If you select to group payables, all these bills will leave your bank account as one line item for this contact
- Once you have selected to Group payables you will need to enter in a new reference for grouped bills. Please make sure the reference is less than 18 characters and doesn't contain any special characters.
- Enter in a name for the pay run and select which bank account you will be processing the payment from. Once you have done so, click the 'Save' button.
- Once saved, you will be redirected to our Pay Runs tab where you will be able to see all the pay runs you have created, ready for payment
Troubleshooting
If you're experiencing issues creating or processing a pay run, please check your bank account settings and refer to our Help Centre article for troubleshooting tips and solutions.
Bank support for pay runs
Before initiating a pay run with Crezco, it's essential to ensure your bank supports bulk payments via open banking. For detailed information on bank compatibility, please refer to our Bank Compatibility Help Centre article.
If you encounter any issues during the pay run process, we recommend contacting your bank's account manager. Inform them that you're attempting to make a payment through open banking, as this context can assist in resolving the problem efficiently.
For further assistance, our Help Centre provides comprehensive guidance on pay runs and related topics.
View your pay runs
To view your created and completed pay runs:
- Log in to your Crezco account.
- Navigate to the Accounts Payable section on the left hand side of your page.
- Click on the Pay Run tab at the top of the page.
Here, you'll find a complete list of all your created and completed pay runs for easy tracking and management.