On this page
Xero Online Payments vs integration
Xero Online Payments and Xero integrations are both excellent ways to maximize Crezco’s payment solutions. For more details on how these features can streamline your payment processes, check out our Help Centre article.
Setting up the integration
(Skip to stage 7 if you have already linked your bank)
- Head to the Xero App Marketplace and search for Crezco.

- Once on our App page follow the Xero sign in button and use your Xero credentials to log in to Crezco.
- Add your display name that will be used in the Crezco app.
- If this is the first time you have connected with your Xero account, you will need to Allow access to Xero and link your bank account with Crezco to allow us to process your payments.
- If you already have a Crezco account, skip to step 7. Otherwise, search and select the bank that you wish to connect to (ensure this is the same as your Xero bank account).
- You will be redirected to your bank's website.
Please follow the instructions on your bank's website and add Crezco as a connection (the exact process will vary with each bank). Once confirmed with your bank, we will be securely connected and able to process payments for you. - Now configure your Xero account with us by navigating to the Integrations tab on the left hand side of your Crezco account. Select All Integrations at the top of the page
- Click on the Connect to Xero
- Confirm which bank account you wish to connect to your Xero bank account (you can add multiple bank accounts within Crezco).
- You will then need to select the matching bank account you would like to use in Xero.
- Confirm which invoice themes you wish the Crezco payment link to be on.
- Review and Confirm the details are correct.

Your Crezco Account is now linked to your Xero account and ready to raise invoices with payment links using Crezco!
Your connected Xero account will appear in integrations and under Xero. If you wish to disconnect, follow the steps here.
Raising an invoice
Once your Xero account is connected to Crezco, you will be able to add payment links directly to your invoices. Then once paid, your invoices will be automatically reconciled.
- The first step is to create your invoice in Xero.
- As you approve your invoice, you have an 'Online Payments' section. If Crezco does not appear, click 'Manage' and change to Crezco to ensure the correct payment link is attached.

- To then email your client this invoice with the Crezco payment link, you can click the 'Email' button in the top right.
- Add the email or contact that you wish to send the invoice to and click 'Send'.
- Your client will receive the email under this format with a tab to 'Pay now' directly on the email or they can view the invoice online by clicking the link.

- When viewing the invoice, they will have the option to 'Pay now'.
- Both 'Pay now' buttons redirect the user to view the payment details in Crezco, showing:
- The amount to be paid
- The payee's name
- The invoice number
- Account number and sort code of the payee
Adding payment links to statements
- Log into your Crezco account and navigate to Accounts Receivables tab and click on the Payment Links section up at the top of the page
- On the right hand side of the page, select 'Create Payment Link'
- Under 'Payment type', select 'Single payment'
- Under 'Fixed Payment Amount' and 'Fixed Payment Reference', you will want to "uncheck" the green button just to the right of it. Then hit 'Next step'.
This gives the payer the ability to enter in the amount in which they would like to pay as well as the reference of the payment
In your email the customer, you can detail what you would prefer them to put for the reference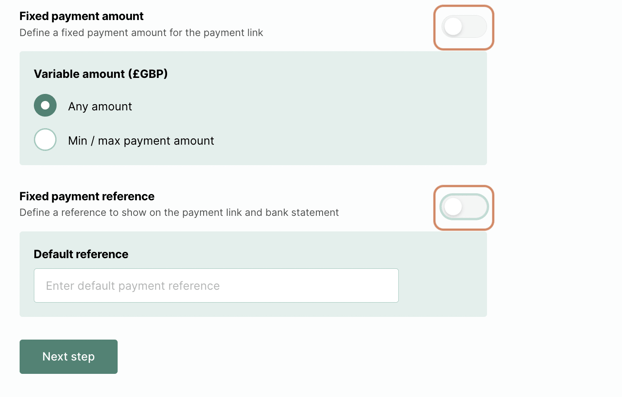
- Under the 'Link Options', you will want to select 'Multiple Use'. This will give you the ability to send this payment link to as many customers as you would like.
- If you have not subscribed to either the Collect Plus or Premium plan, you will not have access to this feature. To see how you can subscribe to this feature, please use the following help centre for more information - Billing
- If you have not subscribed to either the Collect Plus or Premium plan, you will not have access to this feature. To see how you can subscribe to this feature, please use the following help centre for more information - Billing
- Select 'Create Payment Link'
- Click on the copy button next to the payment link that has now been generated

- Navigate to your Xero account
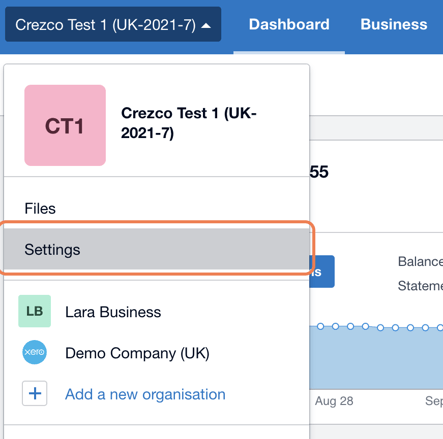
- Click on the company name in the top left hand corner of the screen, and select 'Settings' from the drop down
- Select the 'Invoice settings' tile, and click on 'New Branding theme'
- You will then want to name your new branding theme/invoice template.
- We would recommend using something with Statement in the name so you can differentiate
- We would recommend using something with Statement in the name so you can differentiate
- Under the Terms & Payment Advice you will want to paste the Crezco payment link that we just created.
- You can also specify that you will need the customer to enter in the quoted amount on the statement and what you would prefer to enter in for the reference

- You can also specify that you will need the customer to enter in the quoted amount on the statement and what you would prefer to enter in for the reference
- Save the template.
- Navigate to your Statement page within Xero

- Select who you would to send the statement to, and then click on the Email icon.
- When sending out the email, the section that says Branding, select the drop down menu and there you will see the new statement invoice template that we just created. You will want to select that for the statement you are about to email.

19. The customer will then receive the statement email and have the ability to pay via Crezco.
Setting up repeat payments
The Crezco standing order feature will be sunsetting on the 7th of March, 2025. After March 7th, customers will not be able to creating a standing order payment link in Crezco.
The Crezco 'Pay now' button on all Xero invoices, whether single or repeating, are single payment links. To set up automatic payments via standing order, follow the below process, to make reconciliation with Xero easy.
- Create a repeat Crezco payment link and send it to your client, to set up a standing order. Follow these steps here if needed.
- Then head to your Xero homepage and to your invoices.
- Create a new repeating invoice.
Please ensure that the reference field on Xero is the same as the reference on the Crezco Payment link for reconciliation purposes. - The monthly invoice will be sent from Xero automatically, every month, with the Crezco 'Pay now' button - please note that if your client has already set up a standing order (Step 1 of this process), then they don't need to do act on the pay button on the monthly invoice.
Please note:
When creating a recurring invoice, you can turn off the Crezco payment links on the recurring invoice by doing two things:
-
Create a branding theme (invoice template) in Xero and remove Crezco as a payment service on that theme / template
-
When creating the repeating invoice, make sure you use the new branding theme and set 'Online Payments' to 'None'.
Exporting data from Xero
To find additional information on how to export your bills or payroll from Xero and import them into Crezco, please refer to the following help centre article.
Reconfigure your integration
From time-to-time our integration partners update their APIs, which can disconnect integrations and show this message:
"Something went wrong! If the problem persists please contact the owner of this invoice"
Not to worry - follow these quick steps to get back up and running:
- Log in to your Crezco account using your Xero/QuickBooks login or email.
- Head to the 'Integrations' section under the 'Settings' dropdown, select the required integration and click 'Reconfigure'.
- This should now take you through a couple of steps to reload the configuration and allow you to view the invoice again.
If the problem persists, please contact support.
To avoid this from happening in the future, we recommend that customers reconfigure your integration every 90 days.
Removing integration
- Log in to your Crezco account and navigate to the 'Integrations' section of the 'Settings' dropdown on the left hand side of the page
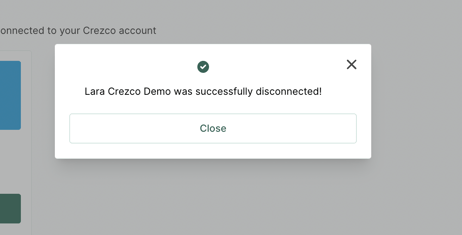
- Click 'Disconnect' under the Xero page.
- Confirm you wish to 'Disconnect'.
- You have now successfully disconnected Xero from your Crezco account.